Category filter
How to Manage BitLocker?
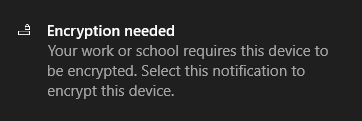
BitLocker is Microsoft’s built-in full volume encryption tool for Windows PC that enforces encryption on system drives, fixed data drives, and removable drives for data protection. BitLocker encryption helps prevent unauthorized access to data on lost or stolen devices by encrypting the entire Windows operating system volume on the hard disk and verifying the boot process integrity. When used in conjunction with TPM versions 1.2 and above, BitLocker can validate system files and boot activity. Hexnode UEM enables you to set up and manage BitLocker policy to help you configure encryption and recovery settings on Windows 10 PC.
Configure BitLocker encryption with Hexnode UEM
- Log in to your Hexnode MDM portal > Navigate to Policies tab > Click on New Policy to create a new one or click on any policy to edit an existing one > Enter the Policy Name and Description in the provided fields.
- Navigate to Windows > Select BitLocker under Security > Click on Configure.
- Configure BitLocker settings.
| BitLocker Settings | Description |
|---|
| Prompt to encrypt storage card | Check this option to prompt users to enable storage card encryption on the device.
|
| Prompt for device encryption | Check this option to prompt users to encrypt the OS drive.
|
| Configure encryption methods for disk drives | Select either Enable or Disable to configure the encryption method (XTS-AES or AES CBC) and cipher strength (128 bit or 256 bit) used by BitLocker.
BitLocker uses the default encryption method of AES CBC 128-bit when this option is either Disabled or not configured.
|
| Settings | Description |
|---|---|
| Encryption method for operating system drive | Select the encryption method for system drives from AES CBC 128, AES CBC 256, XTS-AES 128, XTS-AES 256(Default).
|
| Encryption method for fixed data drives | Select the encryption method for fixed drives from AES CBC 128, AES CBC 256, XTS-AES 128, XTS-AES 256 (Default).
|
| Encryption method for removable drives | Select the encryption method for removable drives from AES CBC 128, AES CBC 256(Default), XTS-AES 128, XTS-AES 256.
|
| Configure authentication when the computer starts up | Select the option Enable/ Disable to configure whether authentication is required each time the computer starts.
This option is set to Select default value when it is either Disabled or not configured. |
| Settings | Description |
|---|---|
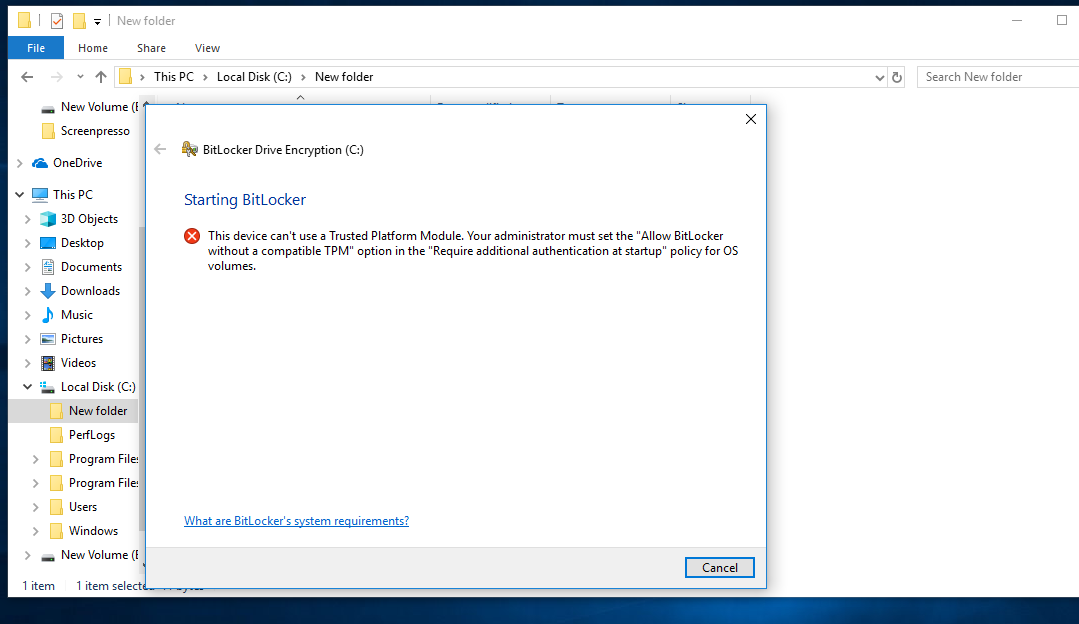
| Allow BitLocker without a Trusted Platform Module (TPM) | Check whether your device has a compatible TPM (more info).
Select the option Allow to enable users to use BitLocker for devices without a compatible TPM. This option is set to Select default value when it is either Disallowed or not configured.
|
| Authenticate with TPM startup key | Select the option Required/ Optional to configure authentication with TPM startup key.
By default, authentication with TPM startup key is set to Disallow. |
| Authenticate with TPM startup PIN | Select the option Required/ Optional to configure authentication with TPM startup PIN.
By default, authentication with TPM startup PIN is set to Disallow. |
| Authenticate with TPM startup key and PIN | Select the option Required/ Optional to configure authentication with both TPM startup key and PIN.
By default, authentication with TPM startup key and PIN is set to Disallow. |
| Enable TPM during startup | Choose whether TPM chip is Required/ Optional during startup.
By default, the option is set to Disallow. |
| Minimum length for BitLocker startup PIN | Enter the minimum length for the BitLocker startup PIN.
You can set a value in the range 6 (default) – 20. |
| Configure pre-boot recovery message | Choose either the option Show default recovery message or URL or Show custom recovery message (more info) and URL to configure a recovery message and URL on the pre-boot recovery screen to assist customers in recovering their key.
Choose the option Do not show any message or URL if you do not want to set up a pre-boot recovery message. This option is set to Select default value when it is not configured.
|
| Configure recovery options for system drives | Enable the option to recover the encrypted system drives in the absence of the required startup key information. |
| Settings | Description |
|---|---|
| Use data recovery agents with BitLocker-enabled OS drive | Check this option to enable a Data Recovery Agent (DRA) to be used with BitLocker-protected operating system drives.
|
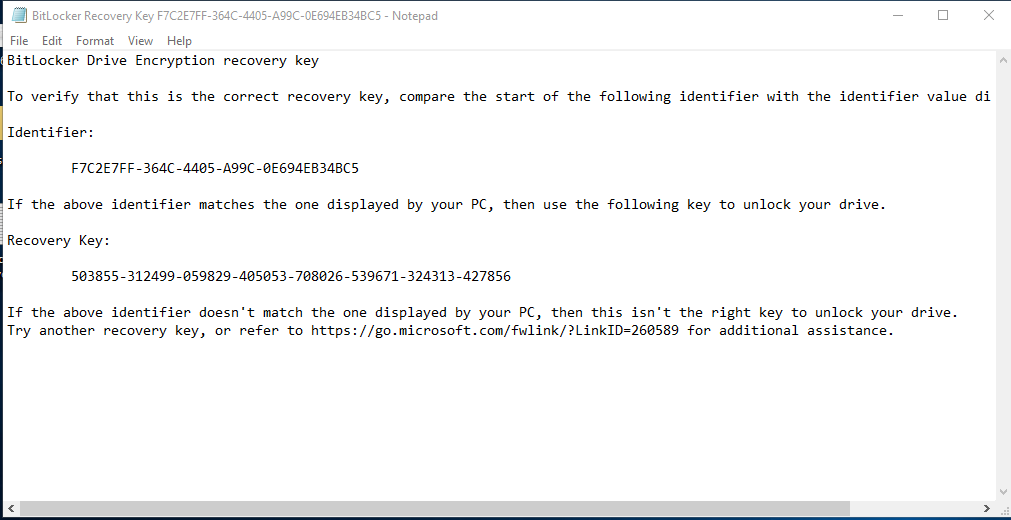
| Generate recovery password | Check this option to enable users to generate a 48-digit recovery password. |
| Generate recovery key | Enable the option so that the system will generate a 256-bit recovery key and is stored in an external USB device. |
| Hide recovery options from BitLocker setup wizard | Tick this box to prevent users from specifying recovery options when they enable BitLocker on a drive through a setup wizard. |
| Save BitLocker info on OS drives to Azure AD DS | Check this option to store the BitLocker recovery information on OS drives to Azure Active Directory Domain Services.
|
| Select recovery information to be stored in Azure AD DS | Select the value Store recovery passwords and key packages or Store recovery passwords only from the drop-down to configure the type of recovery information to be stored in Azure AD DS.
|
| Disable BitLocker until OS drive recovery information is stored in Azure AD DS | Check this box to disable BitLocker until recovery information is stored to Azure AD DS. |
| Configure recovery options for fixed drives | Check this option to recover the encrypted fixed drives in the absence of required credentials. |
| Settings | Description |
|---|---|
| Use data recovery agents with BitLocker-protected fixed data drive | Check this option to enable a Data Recovery Agent (DRA) to be used with BitLocker-protected fixed drives. |
| Generate recovery password | Check this option to enable users to generate a 48-digit recovery password. |
| Generate recovery key | Check this option if you want the system to auto generate a 256-bit recovery key. This key should be stored in an external USB drive. |
| Show recovery options in BitLocker setup wizard | Enable the option to show fixed drives recovery options on the setup wizard. |
| Save BitLocker info on fixed data drives to Azure AD DS | Enable this field to store the BitLocker recovery information on fixed data drives to Azure Active Directory Domain Services. |
| Select recovery information to be stored in Azure AD DS | Select the value Store recovery passwords and key packages or Store recovery passwords only from the drop-down to configure the type of recovery information to be stored in Azure Active Directory Domain Services. |
| Disable BitLocker until fixed drive recovery information is stored in Azure AD DS | Enable this option to prevent users from enabling BitLocker unless the computer backs up the fixed data drive recovery information to Azure Active Directory Domain Services. |
| Fixed drives require encryption | Tick the box to make it mandatory to turn on encryption to write data to a fixed data drive.
|
| Removable drives require encryption | Check the box to make it mandatory to turn on encryption to write data to a removable data drive.
|
How to create a custom recovery message and URL for Bitlocker encrypted PCs?
- Log in to your Hexnode MDM portal > Admin > General Settings.
- Enter a Custom Message and URL under Windows Custom Recovery Message.
How to check whether your device has a compatible TPM?
Method 1
- Press Win+R and open Run > Type tpm.msc > Click OK to open the TPM Management snap-in console.
- It will show whether your device has a compatible TPM or not.
Method 2
- Press Win+R and open Run > Type tpm.msc > Click OK to open the Device Manager.
- Check to see if you have Security devices listed. If yes, expand Security devices to see if you can see a TPM with its version number.
Method 3
Beginning with Windows 10, version 1803, you can check TPM status in Windows Defender Security Center > Device Security > Security processor details.
Apply the BitLocker Configuration to target entities using Hexnode UEM
There are two ways by which you can associate restrictions to the devices in bulk.
If you haven’t saved the policy yet,
- Navigate to Policy Targets.
- Click on + Add Devices, search and select the required device(s) to which you need to apply the policy > Click OK.
- Click on Save to apply the policies to the devices.
If you’ve already saved the policy and taken to the page which displays the policy list,
- Select the required policy.
- Click on Manage > select Associate Targets.
- Search and select the devices/ users/ device groups/ user groups/ domains to which you need to apply the policy. Click Associate.
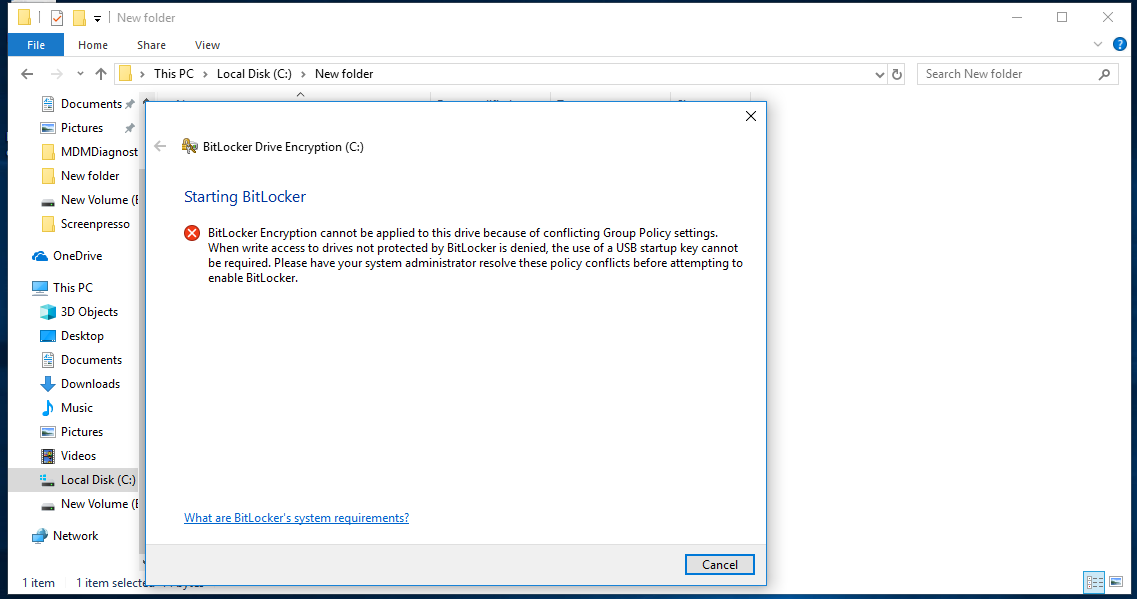
Possible Group policy conflicts
- When write access to drives not protected by BitLocker is denied, the use of a USB startup key cannot be required.
- Storing recovery information to Active Directory Domain Services cannot be required when the generation of recovery passwords is not permitted.
- When OS drive is to be encrypted, if the device has no compatible TPM, “Allow BitLocker without a compatible TPM” should be checked.
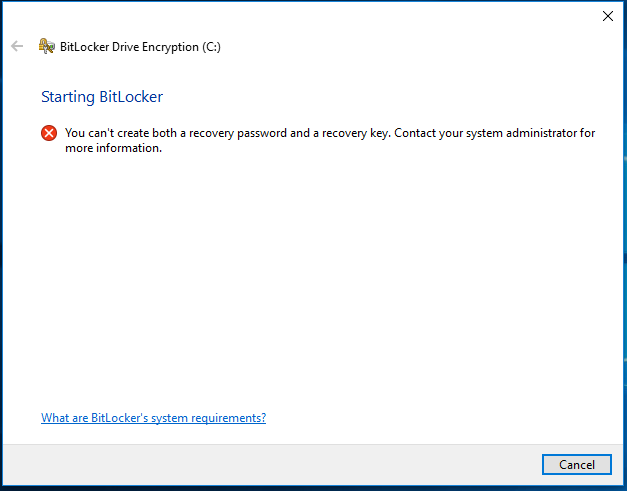
- You cannot create both a recovery key and a recovery password at the same time.
- If one startup authentication method is required, the other method cannot be allowed. If you require the startup key, you must not allow the startup PIN and vice versa.
- If the Deny write access to removable drives not protected by BitLocker policy setting is enabled, the option to generate recovery key must be disallowed.
- Backup of BitLocker recovery information to AD DS must be enabled if both the recovery options are disallowed.
