Category filter
Google Workspace (G Suite) Enrollment for iOS Devices
Hexnode MDM allows you to assign iOS devices to Google Workspace (G Suite) users. You need to initially configure G Suite with the MDM console, followed by enrolling the devices. The enrolled iOS devices will get assigned to the respective G Suite users. Policies and actions can be associated to the devices, users, or whole domain from the Hexnode MDM console to manage and monitor the utilization of these devices.
To Assign devices to G Suite Users
- Configure G Suite.
- Enroll iOS devices via G Suite Authentication.
Configure G Suite
Create Service Account
- Using the G Suite admin credential, login to Google Developers Console.
- Click on Create Project.
- Create a New Project by providing the following details.
- Project Name: Provide a suitable project name and a corresponding project ID will be generated.
- From the Navigation Menu on the left pane, select APIs and Services > Credentials.
- Click on Create Credentials and from the drop-down list that appears select Service account.
- Select New service account and provide the following details.
- Service account name: Provide a suitable name for the service account.
- Service account ID: An account ID will be automatically generated. If required, you can edit it.
- Service account description: Provide a suitable description for your service account.
- Click on Create and Continue.
- Optional: Grant the service account access to the project created above. Select a role from the drop-down list. Click on Select a role. Choose Service Accounts > Service Account Admin, and click Continue.
- Click Done
- From Navigation menu > IAM & Admin > Service Accounts. Select your service account and click on Actions > Manage Details.
- Navigate to SHOW DOMAIN-WIDE DELEGATION. Select the checkbox Enable G Suite Domain-wide Delegation. Click Save.
- Copy the generated Client ID.
- Next, navigate to Keys. Click on Add Key > Create new key and choose the key type as JSON and click on Create.
- A JSON key will be downloaded. This key is later uploaded on to Hexnode MDM server.
- Go back to APIs & Services interface from the Navigation menu. Select Dashboard and click on +ENABLE APIS AND SERVICES.
- In the search box that appears, type Admin SDK API and select the same from the search results.
- Click on Enable to enable Admin SDK API.
Manage API Client Access for MDM
This process provides the MDM with a specific API access to apply the configurations to the managed devices. Ensure to Enable API access in the Admin console.
- Using your G Suite Admin credentials, log in to Google Admin Console and click on Security.
- From API Controls, click on MANAGE DOMAIN WIDE DELEGATION under Domain wide delegation, and click on +Add new.
- Authorize the API clients by providing the following details.
- Client ID: Paste the Client ID copied from Google Developer Console.
- OAuth scopes: Copy and paste the link
https://www.googleapis.com/auth/admin.directory.user – To sync individual users.
https://www.googleapis.com/auth/admin.directory.group – To sync user groups.
https://www.googleapis.com/auth/admin.directory.domain – To fetch the domain.
- Click on AUTHORIZE.
Integration of G Suite with Hexnode MDM Server
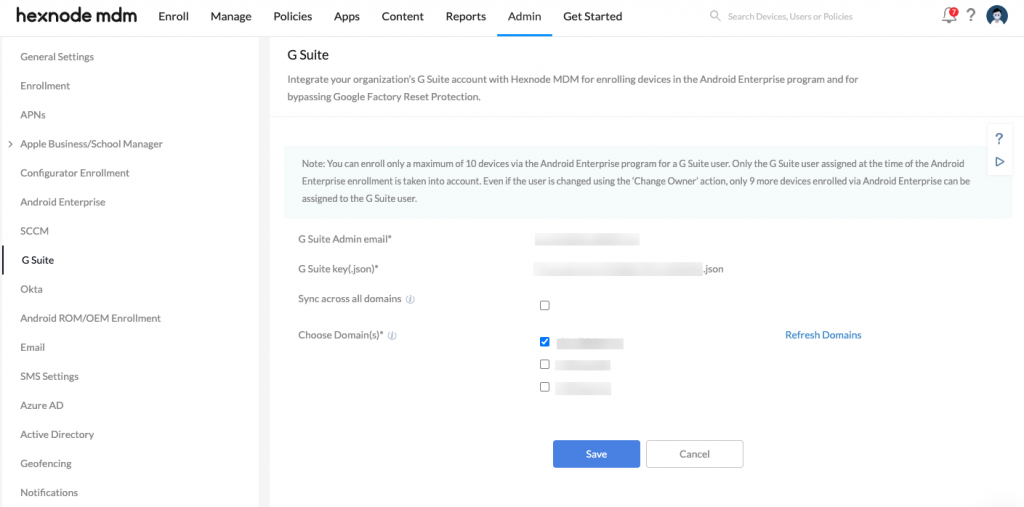
- Login to your Hexnode MDM portal.
- Navigate to Admin > G Suite.
- You will have the following options to be configured.
- G Suite Admin Email: Enter the G Suite admin email address of the domain that you want to synchronize with Hexnode.
- G Suite key: Upload the JSON key previously downloaded.
- Click on Next to configure G Suite.
- Now, 2 new options will be displayed:
- Sync across all domains: Checking this option will sync all the users and/or user groups across all domains. When new domains are created in G Suite, they will be automatically synced during the next sync.
- Choose Domain(s): Only the users and/or user groups present in the selected domains will be synced with Hexnode UEM.
- Click on the Save button to save the configuration.
Enroll iOS devices via G Suite Authentication
Once the G Suite account is configured, you can start enrolling your iOS devices with Hexnode MDM.
- Go to Enroll > Platform-Specific > iOS > Email/SMS.
- Switch the authentication mode to Authenticated Enrollment.
- Select Google User under Enrollment Request or Self Enrollment.
- If you select Google User under Enrollment Request, users will receive an email or SMS with the Hexnode server address and other enrollment instructions.
- If Google User under Self Enrollment is selected no such request will be sent. Users have to enroll devices with their dedicated credentials.
- Change the device Ownership if required.
- Click on Next.
If you have chosen Self Enrollment, your enrollment set up is complete.
But if you have chosen to send Enrollment Request to your G Suite users follow these steps,
- Select a medium to send the request (Email/SMS).
- Change the Domain from Local to your G Suite domain.
- Select the user to whom you want to send the enrollment request and click Save.
On the device,
- Open Safari browser and enter the enrollment URL. It will be of the form: https://portalname.hexnodemdm.com/enroll/.
- This would take you to the enrollment screen. Enable the checkbox to agree with the terms and conditions and click Enroll.
- Enter the user’s G Suite username and password and click Authenticate.
- Provide the necessary permissions to allow profile download.
- After the profile gets downloaded, navigate to Settings > General > Profile. Choose Profile Service.
- Click Install to install the configuration profile and certificate.
- Click Trust to allow remote management.
- When the profile is installed, click Done.
- Go to the device launcher and the Hexnode MDM app start installing.
- Once the app is installed, allow the MDM to access location and send notifications.
