Category filter
Add iOS 11+ Devices to DEP Using Apple Configurator 2.5
Prior to iOS 11, Apple allowed only the devices purchased directly from Apple or authorized resellers to be enrolled in Apple’s Device Enrollment Program (DEP). But now you can add any Apple devices running iOS 11 or later using Apple Configurator (v2.5 or later) to your DEP account and then take advantage of Apple Business/School Manager enrollment.
Create a Wi-Fi profile
Follow the below steps to create a Wi-Fi profile in Apple Configurator:
- Open Apple Configurator.
- From File → New Profile → Wi-Fi, select Configure.
- Enter the SSID, security type, password, and any other relevant settings required to connect to your Wi-Fi network.
- Click Save from the File menu.
Create a Blueprint
Blueprints are templates used for configuring profiles and applications and assigning them quickly to devices. To create a blueprint,
- Open Apple Configurator, go to Blueprints → Edit Blueprints → New. Provide a suitable name for the blueprint.
- Select the newly created blueprint, click Add > Profiles. Select the Wi-Fi profile created earlier and click Add.
Prepare the Blueprint
- Select the blueprint and then click on Prepare.
- Use Manual configuration.
- Make sure to check the option ‘Add to Device Enrollment Program’. Then, choose from the following options:
- Activate and complete enrollment: Uncheck this setting if you have a new or existing device that requires unique user authentication to enroll in MDM and the user must complete the device enrollment. You can enable this setting to manage all the Setup Assistant panes so that the user gets a device ready for use.
- Supervise devices: This option will be automatically selected when the option ‘Add to Device Enrollment Program’ is enabled. Supervised devices unlock additional management capabilities, mainly intended for corporate-owned devices.
- Allow devices to pair with other computers: Enable this option to allow users to sync devices with a Mac or PC using a USB cable.
- Click Next. Add a new MDM server or select it from the list if you’ve added it previously in Apple Configurator 2 preferences.
- To add a new server, select New Server. Click Next.
- Enter a name for the server. On the ‘Host name or URL’ field, enter the enrollment URL provided in your Hexnode portal at Admin > Configurator Enrollment or Enroll > Platform-Specific > iOS > Apple Configurator.
- The required anchor certificates will be automatically added. Click Next.
- Next, you can create a new organization or select an already created organization.
- To add a new organization, select New Organization. Click Next.
- Sign in to your Apple Business Manager or Apple School Manager account. Note that this account should have administrative permissions to manage devices.
- Select Generate a new supervision identity and click Next.
- From the Setup Assistant screen, select the steps to be shown to the user. In case you need to skip all the steps in Setup Assistant, select the ‘Don’t show any of these steps’ option. Click Prepare.
Apply blueprint to enroll iOS 11+ devices in Apple DEP
The blueprint prepared on Apple Configurator can be pushed to the target devices by following the below steps:
- Connect the iOS device to the Mac.
- Once connected, the device will appear on Apple Configurator. Highlight the device by clicking on it.
- Navigate to Blueprints and select the newly prepared blueprint. Click Apply.
- If the device has been previously prepared, you will be prompted to erase the device.
The blueprints will be pushed, and the device will be added to DEP.
Is your iOS device added to DEP?
To verify that your device is added to DEP,
- Sign in to Apple Business Manager (ABM) / Apple School Manager (ASM).
- Navigate to Devices. Choose the filter type as Source and then select Manually Added > Apple Configurator. From the list of available devices, you can verify whether your iOS device is added to DEP or not.
 using Apple configurator")
Assign the added DEP devices to the Hexnode MDM server
Perform the following steps to assign the DEP devices to the MDM server:
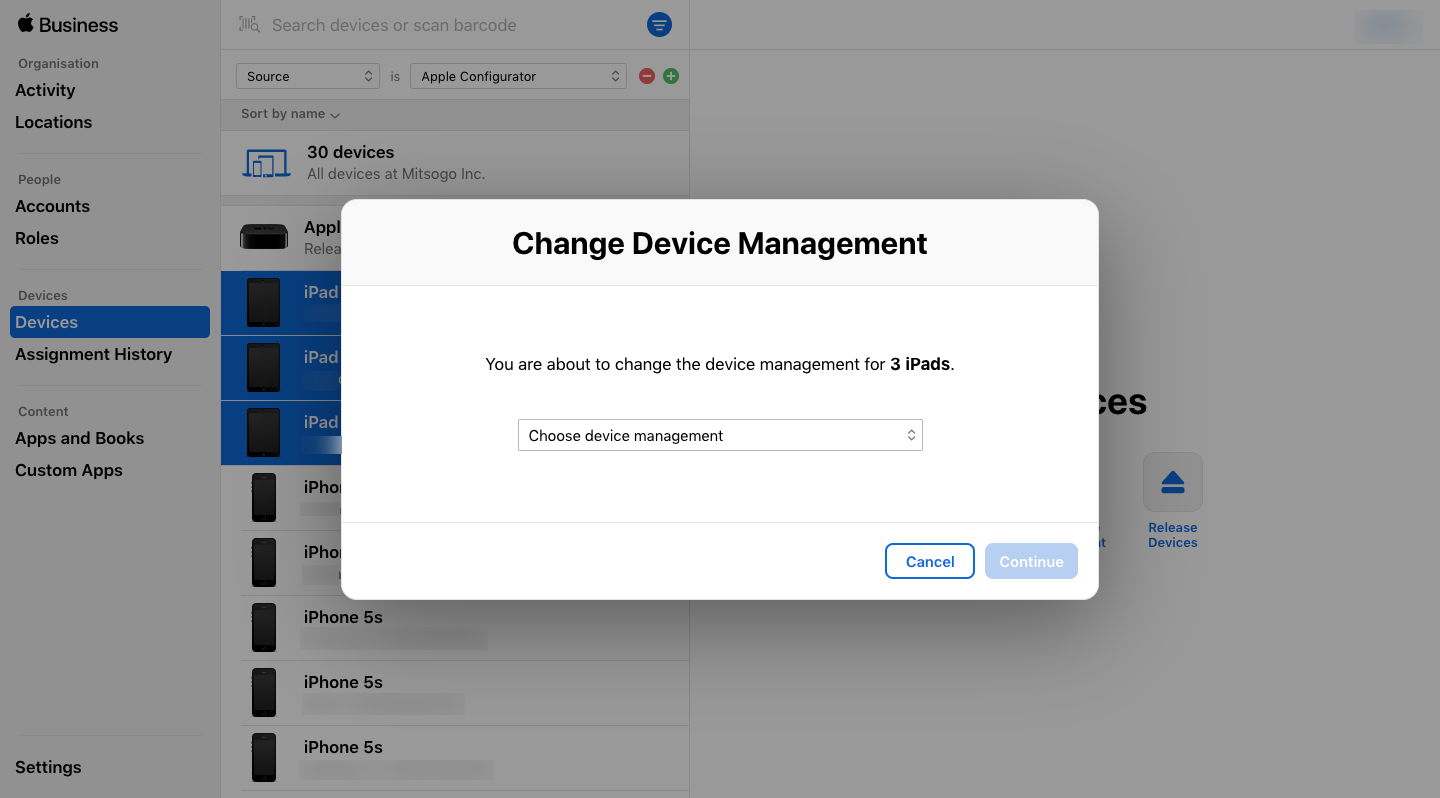
- Log in to your Apple Business Manager or Apple School Manager account.
- Select Devices. Search and select the required devices from the list and click on the database icon.
- Next, click the Choose device management pop-up menu and select the MDM server to assign the devices with that server.
On your Hexnode MDM portal, navigate to Enroll > All Enrollments > No-Touch > Apple Business/School Manager. You’ll find the devices under DEP Devices. If the devices do not appear here, click Sync with DEP to sync with Apple Business Manager or Apple School Manager.

30-day Provisional Period
A device added in Apple DEP via Apple Configurator will behave as a provisionally managed device during the initial 30-days of deployment. This means that the device will take 30 days to transform into an actual DEP enrolled device. This enables the users to remove the MDM management from the device during this 30-day period irrespective of the DEP Profile configurations. During this provisional period, the device will show a banner on the lock screen notifying the users that the device is managed and they can leave remote management from the Settings app. After 30 days, both the banner and the option to leave remote management will disappear from the device, and users will no longer be able to remove remote management.
