Category filter
Google Workspace (G Suite) Enrollment for Windows Devices
Hexnode’s seamless integration with Google Workspace (G Suite) helps businesses to import their users or groups directly to the MDM console. This fluid integration facilitates enterprises to enroll their Windows devices with the configured G Suite account.
First, the organization must set up G Suite with MDM to import its directories in Hexnode. After syncing the users with the portal, admin can either send enrollment requests to the G Suite (Google) users or allow them to enroll their devices with their dedicated credentials manually. In both cases, the users have to authenticate themselves with their G Suite usernames and passwords. In this way, G Suite users can enroll their Windows devices in Hexnode UEM.
Assign the devices to G Suite Users
Enrolling Windows devices via G Suite authentication is a two-step process:
- Configure G Suite
- Enroll Windows devices via G Suite Authentication
Configure G Suite
Create Service Account
- Using the G Suite admin credential, log in to Google Developers Console.
- Click on Create Project.
- Create a New Project by providing the following details.
- Project Name: Provide a suitable project name, and a corresponding project ID will be generated.
- From the Navigation Menu on the left pane, select APIs and Services > Credentials.
- Click on Create Credentials and from the drop-down list that appears select Service account.
- Select New service account and provide the following details.
- Service account name: Provide a suitable name for the service account.
- Service account ID: An account ID will be automatically generated. If required, you can edit it.
- Service account description: Provide a suitable description for your service account.
- Click on Create and Continue.
- Optional: Grant the service account access to the project created above. Select a role from the drop-down list. Click on Select a role. Choose Service Accounts > Service Account Admin, and click Continue.
- Click Done
- From Navigation menu > IAM & Admin > Service Accounts. Select your service account and click on Actions > Manage Details.
- Navigate to SHOW DOMAIN-WIDE DELEGATION. Select the checkbox Enable G Suite Domain-wide Delegation. Click Save.
- Copy the generated Client ID.
- Next, navigate to Keys. Click on Add Key > Create new key and choose the key type as JSON and click on Create.
- A JSON key will be downloaded. This key is later uploaded on to Hexnode MDM server.
- Go back to APIs & Services interface from the Navigation menu. Select Dashboard and click on +ENABLE APIS AND SERVICES.
- In the search box that appears, type Admin SDK API and select the same from the search results.
- Click on Enable to enable Admin SDK API.
Manage API Client Access for MDM
This process provides the MDM with specific API access to apply the configurations to the managed devices. Ensure to Enable API access in the Admin console.
- Using your G Suite Admin credentials, log in to Google Admin Console and click on Security.
- From API Controls, click on MANAGE DOMAIN WIDE DELEGATION under Domain wide delegation, and click on +Add new.
- Authorize the API clients by providing the following details.
- Client ID: Paste the Client ID copied from Google Developer Console.
- OAuth scopes: Copy and paste the link
https://www.googleapis.com/auth/admin.directory.user – To sync individual users.
https://www.googleapis.com/auth/admin.directory.group – To sync user groups.
https://www.googleapis.com/auth/admin.directory.domain – To fetch the domain.
- Click on AUTHORIZE.
Integration of G Suite with Hexnode MDM Server
- Log in to your Hexnode MDM portal.
- Navigate to Admin > G Suite.
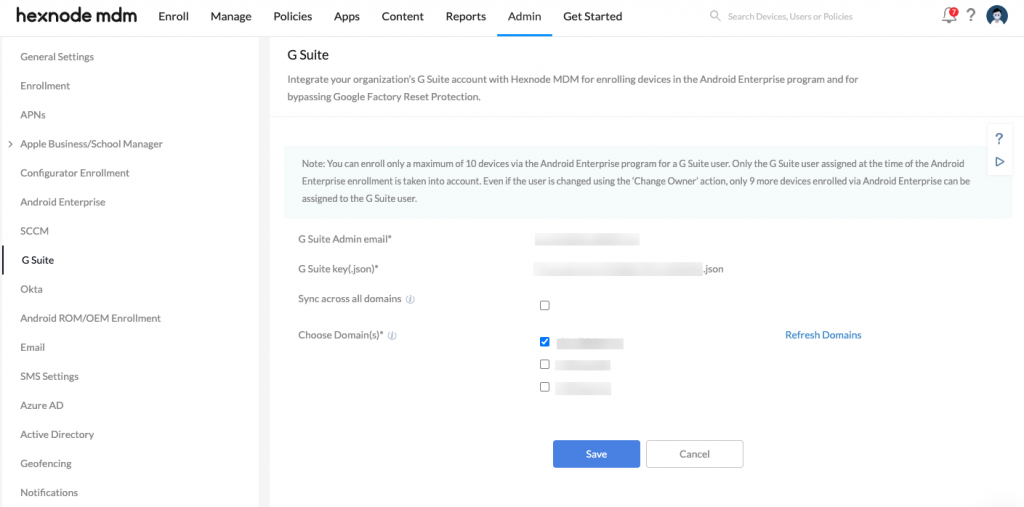
- You will have the following options to be configured.
- G Suite Admin Email: Enter the G Suite admin email address of the domain that you want to synchronize with Hexnode.
- G Suite key: Upload the JSON key previously downloaded.
- Click on Next to configure G Suite.
- Now, 2 new options will be displayed:
- Sync across all domains: Checking this option will sync all the users and/or user groups across all domains. When new domains are created in G Suite, they will be automatically synced during the next sync.
- Choose Domain(s): Only the users and/or user groups present in the selected domains will be synced with Hexnode UEM.
- Click on the Save button to save the configuration.
Enroll Windows devices via G Suite Authentication
Once the G Suite account is configured, you can start enrolling your Windows devices in Hexnode UEM.
Step 1: Enrollment Setup
You can either send enrollment requests (Email/SMS) to the G Suite users or allow them to enroll manually using the ‘Self Enrollment’ feature.
- Go to Enroll > Platform-Specific > Windows > Windows PCs & Tablets.
- Switch the authentication mode to Authenticated Enrollment.
- Select Google User under Enrollment Request. In this case, users will receive an email or SMS with the Hexnode server address and other enrollment instructions.
- Change the device Ownership if required.
- Click Next.
- Select the mode for sending enrollment requests to the G Suite users as Email, SMS, or even both.
- Change the Domain from Local to your G Suite domain and select the user you need to send the enrollment request.
- Click Send. The enrollment request will be successfully sent to the selected Google user.
- Go to Enroll > Platform-Specific > Windows > Windows PCs & Tablets.
- Switch the authentication mode to Authenticated Enrollment.
- Select Google User under Self Enrollment.
- Change the device Ownership if required.
- Click Next.
- The enrollment settings will be successfully updated, and the users can now enroll their devices with their dedicated credentials.
Step 2: Enroll the device via Authenticated Enrollment
Hexnode offers two enrollment methods to enroll Windows devices.
Follow the below steps on your Windows machine to enroll it using the Hexnode Installer app:
- Enter the Hexnode enrollment URL on a web browser. The URL will be of the format:
1https://{portalname}.hexnodemdm.com/enroll/
- The URL will take you to a page where you can download the Hexnode Installer app.
- Click Download to initiate the Hexnode Installer app download.
- Open the app and click Yes on the ‘Hexnode Installer Setup’ wizard to grant permission for the app to make changes to the device.
- Click Install to continue with the installation.
- Next, go through the EULA agreement and then click Agree and Enroll.
- Now, change the domain from local to your G Suite domain and enter your G suite credentials. Click Authenticate.
- Next, the device will process the enrollment request. In case the processing fails,
- Click Enroll to take you to Settings > Accounts > Access Work or School > Enroll in Device Management on your device.
- The username and the enrollment server address will be auto-filled on the ‘Set up a work or school account’ pane. Click Next.
- Go through the device setup instructions and click Got It to connect Hexnode to the Workplace or School. It may take a few minutes to set up the connection. Any configurations or apps that the organization has set up for the user will be applied to the device. In case the device takes more time to set up the connection, navigate to Settings > Accounts > Access work or school > Info > Sync.
- The agent app (HexnodeAgent) will be installed on the device, and all the configurations will be automatically applied to it. Click Done to exit the Hexnode Installer.
- Click Finish to exit the setup.
- On your Windows device, go to Settings > Accounts > Access work or school.
- Click Enroll only in device management.
- Enter your work email and click Next.
- You’ll be asked to enter your Microsoft password, neglect this step by closing the tab.
- Next, enter the enrollment URL which will be of the format:
1https://{portalname}.hexnodemdm.com
- Click Next.
- On the authentication page, click Sign in with Google and authenticate by entering your G Suite username and password.
- Click Got It after reading the setup instructions. The Windows device is now successfully enrolled with Hexnode UEM.
